微信小程序学习实践:swiper的使用,checkbox的使用
发布时间:2018-03-28 14:50 所属栏目:小程序开发教程
第一部分:入门实践
1.下载微信小程序编辑器:下载微信小程序编辑器
2.创建小程序应用:打开刚才下载的dmg,用微信扫面二维码登陆。点击本地小程序项目,就可以开始开发了。
3.先介绍下目录结构:
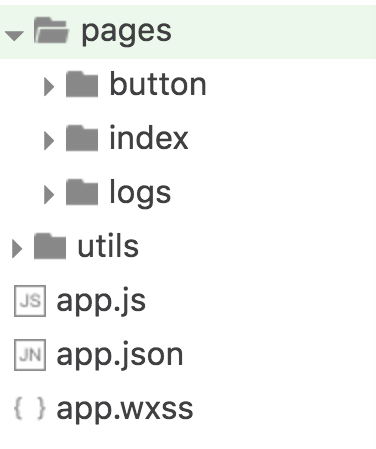
pages文件夹中放的都是页面,app.js相当于iOS的appdelegate,app.json就是app的配置,app.wxss就是css样式文件。
每一个页面都单独有一个js,json,wxss文件。
4.app.json文件分析
{//所有的页面都在这里列出来
  "pages":[
    "pages/index/index",
    "pages/logs/logs",
    "pages/button/button"
  ],
  "window":{ //app的样式
    "backgroundTextStyle":"light",
    "navigationBarBackgroundColor": "#fff",
    "navigationBarTitleText": "WeChat",
    "navigationBarTextStyle":"black"
  }
}
5.先做一个小demo(js,json,wxml,wxss都是新建的)
代码:
//获取应用实例
var app = getApp()
Page({
  data:{
    count:0,
    text: '加载了了0次',
    loadingstatus: false,
  },
  onLoad:function(options){
    // 页面初始化 options为页面跳转所带来的参数
    console.log("onLoad");

  },
  onReady:function(){
    // 页面渲染完成
    console.log("onReady");
  },
  onShow:function(){
    // 页面显示
    console.log("onShow");
  },
  onHide:function(){
    // 页面隐藏
    console.log("onHide");
  },
  onUnload:function(){
    // 页面关闭
    console.log("onUnload");
  },
  button1click: function(){
   var that = this;
   that.data.count++;
   that.setData({ //更改属性的值
       text:'加载了'+that.data.count+'次',
       loadingstatus:that.data.count%2 == 0 ? true:false,
   })
  },
})

//这里的data就是页面的数据和函数,
onShow,onHide,onReady,onUnload都是生命周期函数,
button1Click是button的click函数
这框架是data和页面的绑定起来的,只要改变data的值,页面就会随着变化,这点和iOS有点不同。

button.json 文件
{
     "navigationBarTitleText": "ButtonDemo" 这是页面的title
}

button.wxml文件

<view class="container">
    <view class="button-wrapper">
    <button type="default" bindtap="button1click"  size="default"
    loading="{{loadingstatus}}" > 点我
    </button>
     </view>
<text class="countClick" id="text1">{{text}}
</text>
</view>

button.wxss

.countClick{
    margin-top: 100rpx;
    width: 200rpx;
    height: 50rpx;
    text-align: center;
    font-size: 1em;
    background-color: cadetblue;
}

 bindtap="button1click"  绑定点击事件到buttonclick函数
{{text}}   {{data中的属性}}
今天还看到一段比较好玩的代码:
for (var i = 0; i < types.length; ++i) {
  (function(type) {
    pageObject[type] = function(e) {
      var key = type + 'Size'
      var changedData = {}
      changedData[key] =
        this.data[key] === 'default' ? 'mini' : 'default'
      this.setData(changedData)
    }
  })(types[i])
可能做iOS的没看过js的人这点看不太懂,我也是新手,哪里说的不对,欢迎前端大神指正。
大概意思是:
for (var i = 0; i < types.length; ++i) { 循环数组
  (function(type) { //写法js(function)(item)
    pageObject[type] = function(e) { //添加属性函数 就是增加了几个函数。
      var key = type + 'Size' //拼接字符串
      var changedData = {} //字典
      changedData[key] = //字典赋值
        this.data[key] === 'default' ? 'mini' : 'default'
      this.setData(changedData) //相当于iOS的kvo用hash值的方式给自己的属性赋值
    }
  })(types[i]) //执行函数
第二部分:swiper的使用
这个类似iOS的滚动视图,里边也可以放一下其他的东西。
先讲一下属性:
| 属性名 | 类型 | 默认值 | 说明 |
|---|---|---|---|
| indicator-dots | Boolean | false | 是否显示面板指示点 |
| autoplay | Boolean | false | 是否自动切换 |
| current | Number | 0 | 当前所在页面的 index |
| interval | Number | 5000 | 自动切换时间间隔 |
| duration | Number | 1000 | 滑动动画时长 |
| bindchange | EventHandle | current 改变时会触发 change 事件,event.detail = {current: current} |
swiper.js文件
var app = getApp();
Page({
  data:{
    indicatordos:true,
    autoplay:true,
/*图片数组*/
    imgUrls: [
      'http://img02.tooopen.com/images/20150928/tooopen_sy_143912755726.jpg',
      'http://img06.tooopen.com/images/20160818/tooopen_sy_175866434296.jpg',
      'http://img06.tooopen.com/images/20160818/tooopen_sy_175833047715.jpg',
      'http://imgsrc.baidu.com/forum/pic/item/1080fc8b87d6277f026c80b428381f30e824fc46.jpg',
      'http://imgsrc.baidu.com/forum/pic/item/2eadcbef76094b366ac0bf0da3cc7cd98c109d84.jpg',
      'http://img1.tgbusdata.cn/v2/thumb/jpg/MGNlNiw3MzAsNzMwLDQsMSwxLC0xLDAscms1MA==/u/olpic.tgbusdata.cn/uploads/allimg/130124/62-130124160054.jpg'
    ],
    vertical:true,
  },

  displaychange:function(event){
      console.log(event.detail.current);//输出来当前swiper-item的index
   },

  changeautodisplay:function(){
    this.setData({
      autoplay:!this.data.autoplay//设置是否自动播放
  })
  },
  changeindicator:function(){
    this.setData({
  indicatordos:!this.data.indicatordos//隐藏图片那个点
})
  },
  changevertical:function(){
    this.setData({//设置水平方向
      vertical:!this.data.vertical
    })
  }

})
swiper.xml文件
<view class="container">
<view class="swiperview">
<swiper class="swiperitem" indicator-dots="{{indicatordos}}" autoplay="{{autoplay}}"
bindchange="displaychange" duration="1000" interval="2000"
vertical="{{vertical}}"
>
<block wx:for="{{imgUrls}}">
<swiper-item>
<image src="{{item}}"></image>
</swiper-item>
</block>
</swiper>
</view>
<view vlass="bottomview">
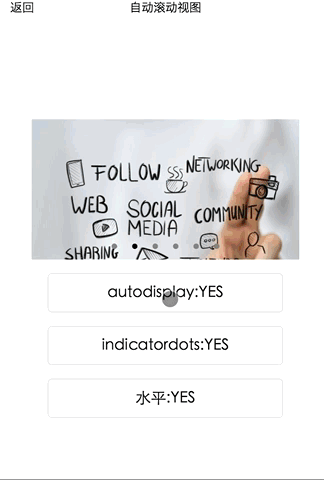
<button type="default" bindtap="changeautodisplay" class="bottomButton">autodisplay:{{autoplay?"YES":"NO"}}</button>
<button type="default" bindtap="changeindicator" class="bottomButton">indicatordots:{{autoplay?"YES":"NO"}}</button>
<button type="default" bindtap="changevertical" class="bottomButton">水平:{{autoplay?"YES":"NO"}}</button>
//这里边用了一个简单的判断语句 :{{autoplay?"YES":"NO"
</view>
</view>
效果如下:
第三部分:checkbox的使用
其实就是复选框:
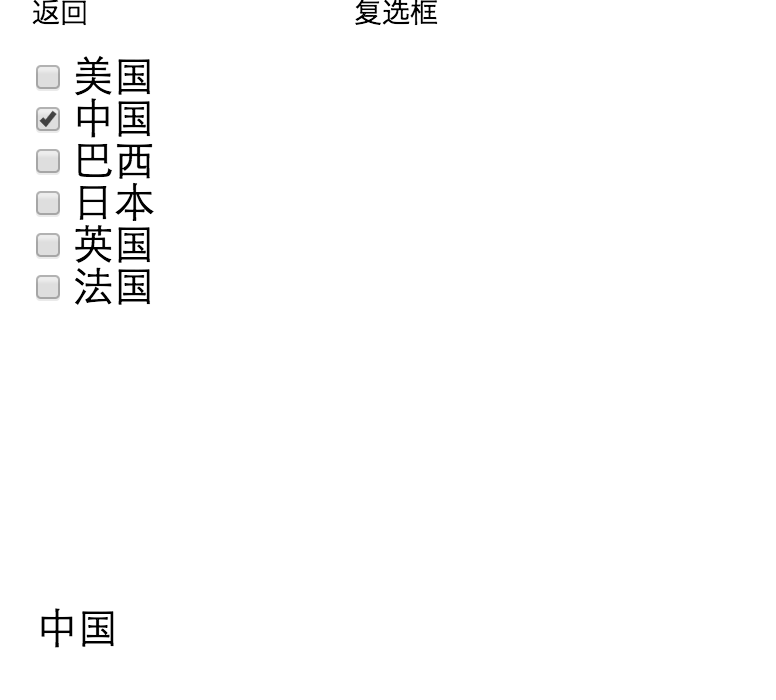
下边用了text显示了当前选中的name。
js文件
首先要设置data的list
Page({
  data:{
     items: [
      {name: 'USA', value: '美国'},
      {name: 'CHN', value: '中国', checked: 'true'},
      {name: 'BRA', value: '巴西'},
      {name: 'JPN', value: '日本'},
      {name: 'ENG', value: '英国'},
      {name: 'TUR', value: '法国'},
    ],
    text:'',//用来显示选中的box
  },

  onShow:function(){
    // 页面显示 第一次进入页面统计选中的box 调用函数。
    this.check();
  },

  change:function(e){
      console.log(e.detail.value);
      var te="暂时没选中";
      if(e.detail.value.length == 0)
        {
        } else {
         te = e.detail.value;
        }
         this.setData({
        text:te
      })

  },
********遍历是否有选中的***********
  check:function(){
    var te="";//遍历是否有选中的
    for(var i = 0;i < this.data.items.length;i ++){
      var item = this.data.items[i];
      if(item.checked){ //如果选中 加到字符串中
        te += item.value;
      }
    }
      if(te.length == 0)
        {
         te = "暂时没选中" ;
        }
         this.setData({
        text:te
      })
    }
})
xml文件
<view class = "contain">
    <view class="bd">
        <checkbox-group bindchange="change"> //绑定事件
            <label class="checkbox" wx:for="{{items}}">//循环绑定到item
                <checkbox value="{{item.value}}" checked="{{item.checked}}"
                >
                {{item.value}}
                </checkbox>
            </label>
        </checkbox-group>
    </view>

    <view class="checkfooter">
    <text >{{text}}</text>//显示选中的数据的name
    </view>
</view>
css文件
.bd{
    width: 800rpx;
    height: 500rpx;
    margin-left: 50rpx;
}
.checkbox{
   display: block;//这个要一定写的 暂时没搞懂意思  应该是一种布局方式。
   margin: 20;
}
.checklabel{
    width: 500rpx;
    height: 200rpx;
}
.checkfooter{
    margin-left: 50rpx;
}
效果如下:


