用Baas在腾讯云上开发小程序-系列3 :实现腾讯云COS API调用
发布时间:2018-04-14 14:21 所属栏目:小程序开发教程
一、实验简介
本实验通过调用腾讯云对象存储(COS)接口,实现将图片上传到指定的 Bucket 功能;同时封装图片上传接口,用于上传商品图片。
二、实验目标
- 掌握 RESTFul API 接口调用和调试方法
- 掌握 RESTFul API 封装方法
三、实验步骤
3.1 添加云应用
第一步: clone xqcloud 项目
1. cd <your project path>
2. git clone https://git.oschina.net/xpmjs/xqcloud.git xqcloud
第二步: 修改远程仓库地址,提交到远程仓库
1. git remote remove origin
2. git remote add origin ssh://git@dev.appcook.cn:2222/source/xqcloud.git
3. git push origin master
3.2 调用 COS API,实现文件上传功能
第一步: 编写 Cos Model vi xqcloud/model/Cos.php
1. <?php
2. use \Tuanduimao\Mem as Mem;
3. use \Tuanduimao\Excp as Excp;
4. use \Tuanduimao\Err as Err;
5. use \Tuanduimao\Conf as Conf;
6. use \Tuanduimao\Model as Model;
7. use \Tuanduimao\Utils as Utils;
8. use \Tuanduimao\Loader\App as App;
9. /**
10. * cos对象存储11. */
12. class CosModel {
13. function __construct( $opt=[] ) {
14. $this->appid = isset($opt['appid']) ? $opt['appid'] : "";
15. $this->bucket = isset($opt['bucket']) ? $opt['bucket'] : "";
16. $this->SecretID = isset($opt['SecretID']) ? $opt['SecretID'] : "";
17. $this->SecretKey = isset($opt['SecretKey']) ? $opt['SecretKey'] : "";
18. }
19. /**
20. * 签名
21. * @param array $opt [description]
22. * @return [type] [description]
23. */
24. function sign( $opt=[] ) {
25. $randstr= $this->generateId(10);
26. $t = isset($opt['e']) ? time()+86400 : 0;
27. $a = isset($opt['appid']) ? $opt['appid'] : $this->appid;
28. $b = isset($opt['bucket']) ? $opt['bucket'] : $this->bucket;
29. $k = isset($opt['SecretID']) ? $opt['SecretID'] : $this->SecretID;
30. $e = isset($opt['e']) ? $opt['e'] : time()+3600;
31. $SecretKey = isset($opt['SecretKey']) ? $opt['SecretKey'] : $this->SecretKey;
32. $s = [
33. "a" => $a,
34. "b" => $b,
35. "k" => $k,
36. "e" => $e,
37. "t" => time(),
38. "r" => $randstr,
39. "f" =>$opt['file'],
40. ];
41. // 拼接字符串
42. $orignal = "a={$s['a']}&k={$s['k']}&e={$s['e']}&t={$s['t']}&r={$s['r']}&f={$s['f']}&b={$s['b']}";
43. $signTmp = hash_hmac( 'SHA1', $orignal, $SecretKey , true );
44. $sign = base64_encode($signTmp.$orignal);
45. return $sign;
46. }
47.
48. /**
49. * 文件转.字符串
50. * @param [type] $imageUrl [description]
51. * @param array $opt [description]
52. * @return [type] [description]
53. */
54. function uploadByUrl( $imageUrl, $opt=[] ) {
55. $imageData = file_get_contents( $imageUrl );
56. return $this->upload( $imageData, $opt );
57. }
58.
59. /**
60. * 文件上传61. * @param [type] $imageData [description]
62. * @param array $opt [description]
63. * @return [type] [description]S
64. */
65. function upload( $imageData, $opt=[] ){
66. // 生成随机数
第二步: 编写测试用控制器 vi xqcloud/controller/Cos.php
1. <?php
2. use \Tuanduimao\Loader\App as App;
3. use \Tuanduimao\Utils as Utils;
4. use \Tuanduimao\Tuan as Tuan;
5. use \Tuanduimao\Excp as Excp;
6. use \Tuanduimao\Conf as Conf;
7.
8. class CosController extends \Tuanduimao\Loader\Controller {
9.
10. function __construct() {
11. }
12.
13. function tryit() {
14.
15. $config = [
16. 'region'=>'<tj/sh/gd>',
17. 'appid'=>'<your appid>',
18. 'bucket'=>'<your bucket>',
19. 'SecretID'=>"<your SecretID>",
20. 'SecretKey'=>"<your SecretKey>"
21. ];
22. $cos = App::M('Cos',$config);
23. $content =file_get_contents("http://7xleg1.com1.z0.glb.clouddn.com/x1/2/lab/uploadit.jpg");
24. $resp = $cos->upload( $content, ['region'=>$config['region'], '
filetype'=>'jpg'] );
25. Utils::out($resp);
26. }
27.
28. }
第三步: 提交代码并更新线上
1. git add *
2. git commit -m '+COS Tryit {{pull}}' # {{pull}} feed 指令更新线上代码
3. git push
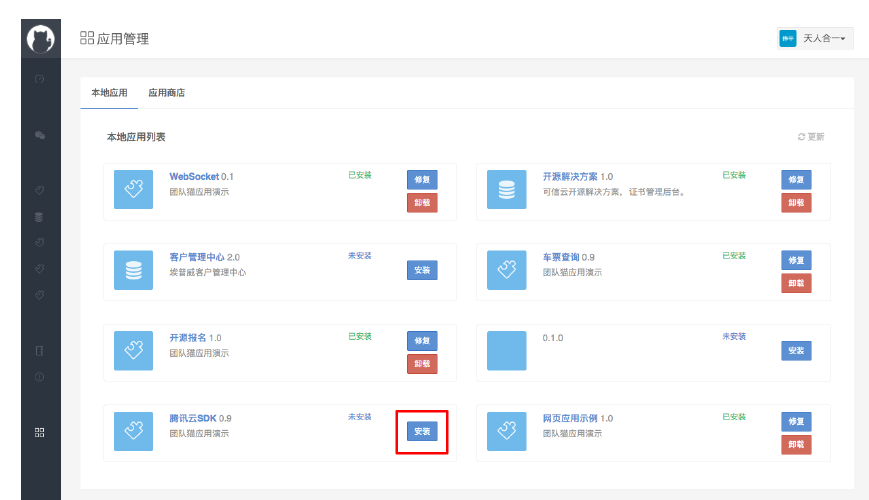
第四步: 安装 XQCloud 应用
访问 https://dev.appcook.cn/core-system/appmanager/index , 安装应用
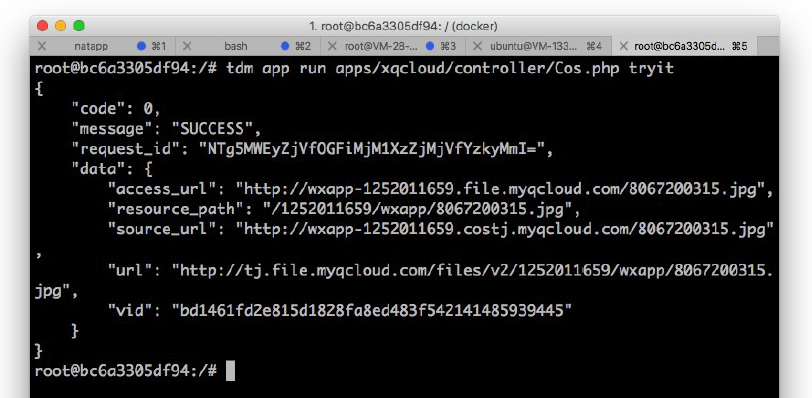
第五步: 登录云主机,运行测试
1. docker exec -it xpmjs-server /bin/bash # 进入容器
2. tdm app run /apps/xqcloud/controller/Cos.php tryit # 运行测试
3.3 封装图片上传接口
第一步: 创建配置文件 vi xqcloud/config.php
1. <?php
2. $GLOBALS['_QC'] = [
3. 'cos'=>[
4. 'region'=>'<tj/sh/gd>',
5. 'appid'=>'<your appid>',
6. 'bucket'=>'<your bucket>',
7. 'SecretID'=>"<your SecretID>",
8. 'SecretKey'=>"<your SecretKey>"
9. ]
10. ];
第二步: 修改控制器 vi xqcloud/controller/Cos.php
1. <?php
2. require_once(__DIR__ . '/../config.php');
3. use \Tuanduimao\Loader\App as App;
4. use \Tuanduimao\Utils as Utils;
5. use \Tuanduimao\Tuan as Tuan;
6. use \Tuanduimao\Excp as Excp;
7. use \Tuanduimao\Conf as Conf;
8.
9. class CosController extends \Tuanduimao\Loader\Controller {
10.
11. function __construct() {
12. }
13.
14. /**
15. * 上传文件接口
16. * @return [type] [description]
17. */
18. function upload() {
19.
20. $file = !empty($_FILES['wxfile']) ? $_FILES['wxfile'] : [];
21. $content = !empty($file['content']) ?base64_decode($file['content']) : NULL;
22. $filetype = Utils::mimes()->getExtension($file['type']);
23.
24. if ( $content == null ) {
25. echo (new Excp("未接收到文件", 502, ['_FILES'=>$_FILES]))->toJSON();
26. return;
27. }
28.
29. $config = $GLOBALS['_QC']['cos'];
30. $cos = App::M('Cos',$config);
31. try {
32. $resp = $cos->upload( $content, ['region'=>$config['region' ], 'filetype'=>$filetype] );
33. } catch( Excp $e ){
34. $extra = $e->getExtra();
35. echo (new Excp("COS API 错误", 502, ['resp'=>$resp, 'e'=>$extra]))->toJSON();
36. return;
37. }
38. if ( $resp['code'] == 0) {
39. Utils::out($resp['data']);
40. return;
41. }
42. echo (new Excp("COS API 错误", 502, ['resp'=>$resp]))->toJSON();
43. return;
44.
45. }
46. }
第三步: 提交代码更新
1. git add *
2. git commit -m '+COS Upload {{pull}}' # {{pull}} feed 指令更新线上代码
3. git push
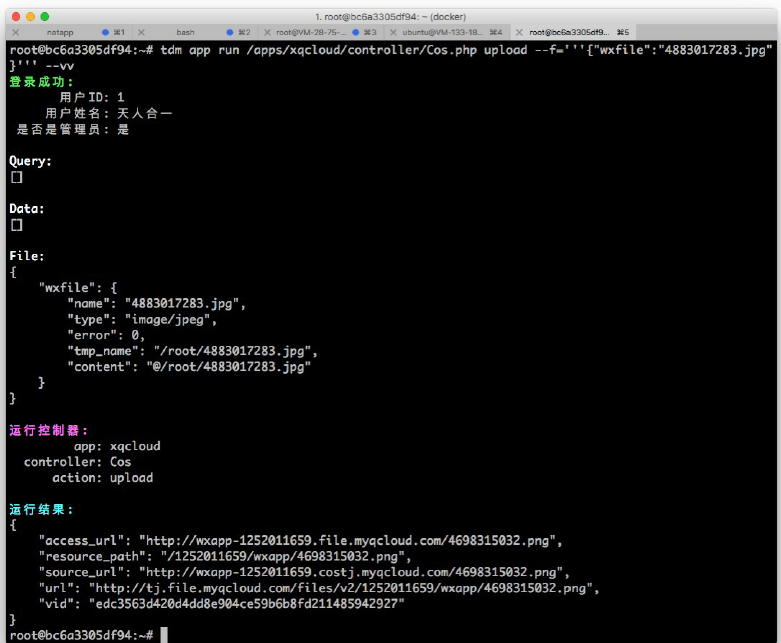
第四步: 登录云主机,运行测试
1. docker exec -it xpmjs-server /bin/bash # 进入容器
2. cd ~
3. wget http://wxapp-1252011659.file.myqcloud.com/4883017283.jpg
4. tdm app run /apps/xqcloud/controller/Cos.php upload --f='''{"wxfile":"4883017283.jpg"}''' --vv
四、实验结果
通过调用 COS 接口,掌握 RESTFul API 调用和调试的方法;通过封装图片上传接口,掌握
RESTFul API 的封装方法。


