二重奏 给ofo撸一个微信小程序之扫码
页面分析
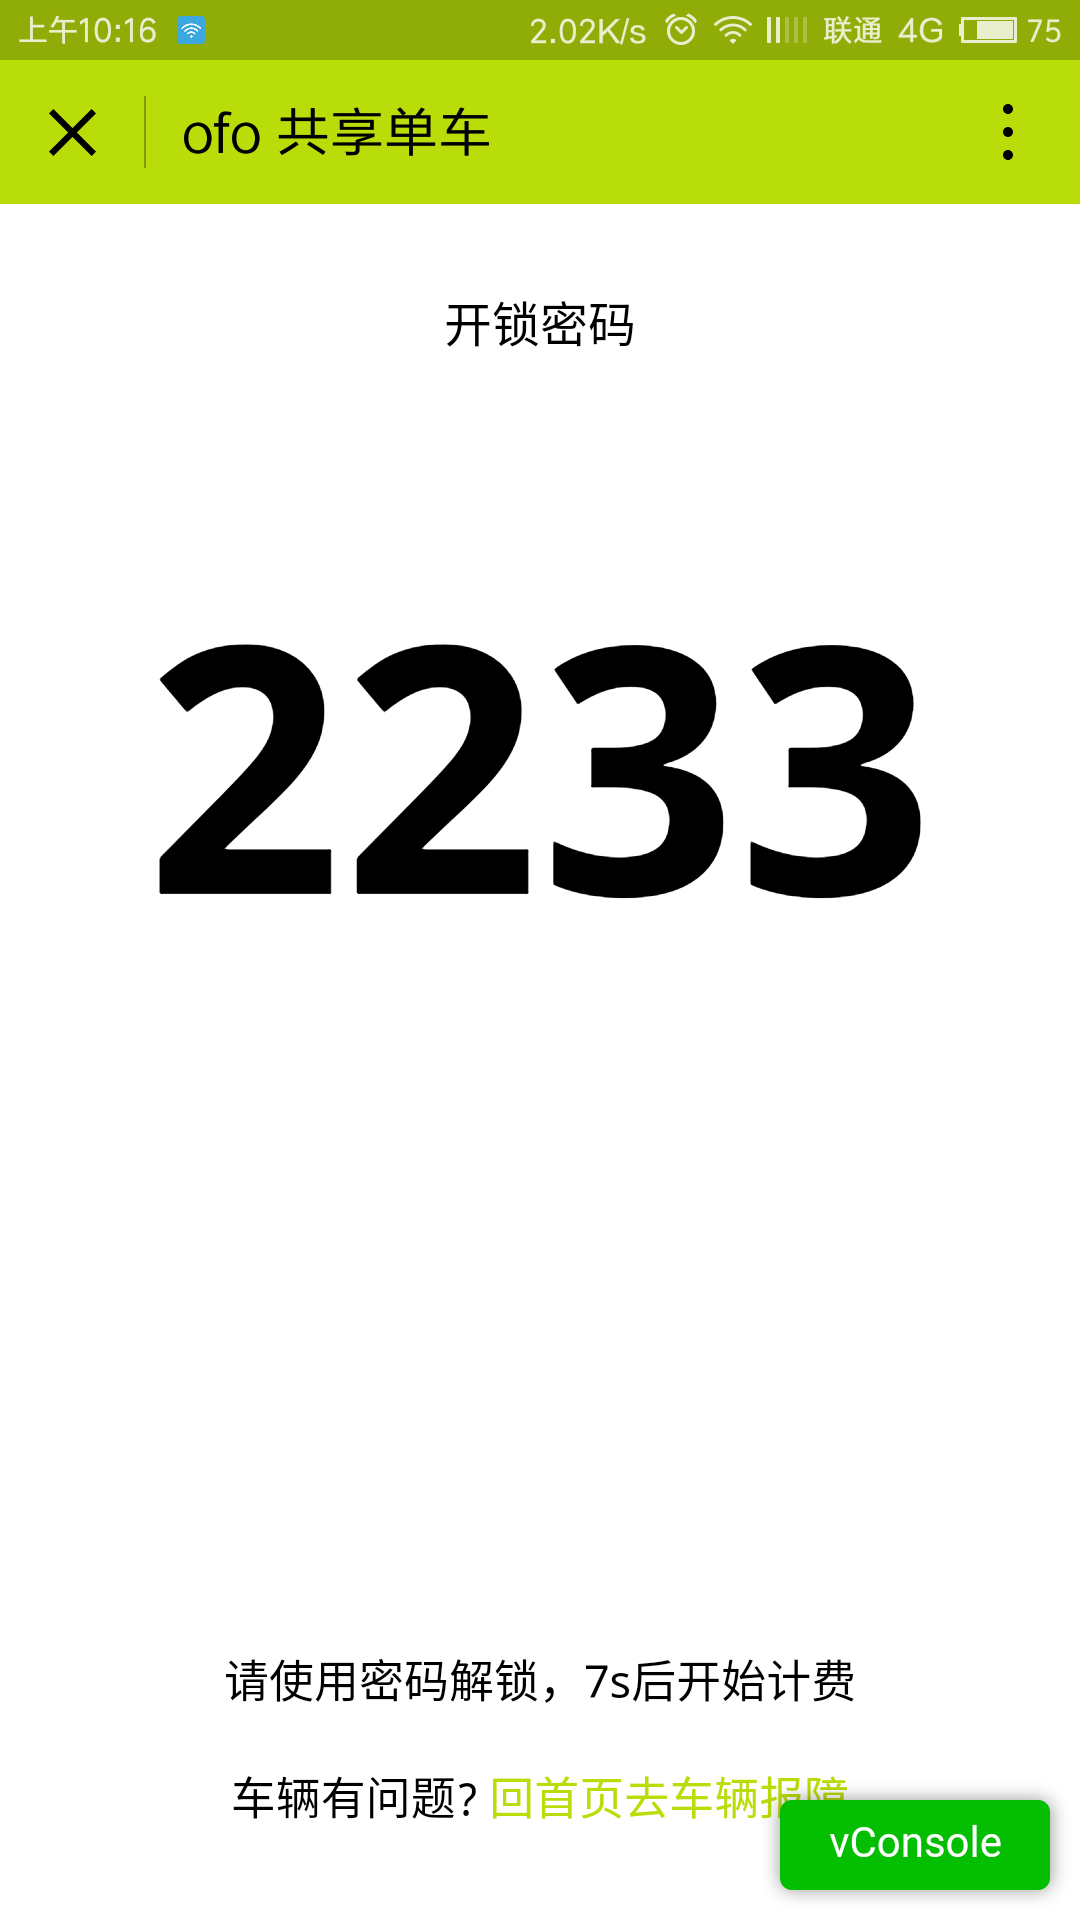
1.后台需要拿到开锁密码,然后显示在页面上
2.我们需要一个定时器,规定多长时间用来检查车辆,这期间可以点击回首页去车辆报障链接,当然也就取消了本次扫码。
3.检查时长完成后,自动跳转到计费页面
1.页面布局
<!--pages/scanresult/index.wxml-->
<view class="container">
    <view class="password-title">
        <text>开锁密码</text>
    </view>
    <view class="password-content">
        <text>{{password}}</text>
    </view>
    <view class="tips">
        <text>请使用密码解锁,{{time}}s后开始计费</text>
        <view class="tips-action" bindtap="moveToWarn">
            车辆有问题?
            <text class="tips-href">回首页去车辆报障</text>
        </view>
    </view>
</view>
2.页面样式
.container{
    width: 100%;
    display: flex;
    flex-direction: column;
    align-items: center;
    justify-content: space-between;
    background-color: #fff;
}
.password-title,.tips{
    width: 100%;
    flex: 1;
    text-align: center;
    padding: 60rpx 0;
}
.password-content{
    width: 100%;
    flex: 8;
    text-align: center;
    font-size: 240rpx;
    font-weight: 900;
}
.tips{
    font-size: 32rpx;
}
.tips .tips-action{
    margin-top: 20rpx;
}
.tips .tips-href{
    color: #b9dd08
}
3.页面数据逻辑
// pages/scanresult/index.js
Page({
  data:{
    time: 9 // 默认计时时长,这里设短一点,用于调试,ofo app是90s
  },
// 页面加载
  onLoad:function(options){
    // 获取解锁密码
    this.setData({
      password: options.password
    })
    // 设置初始计时秒数
    let time = 9;
    // 开始定时器
    this.timer = setInterval(() => {
      this.setData({
        time: -- time
      });
      // 读完秒后携带单车号码跳转到计费页
      if(time = 0){
        clearInterval(this.timer)
        wx.redirectTo({
          url: '../billing/index?number=' + options.number
        })
      }
    },1000)
  },
// 点击去首页报障
  moveToWarn: function(){
    // 清除定时器
    clearInterval(this.timer)
    wx.redirectTo({
      url: '../index/index'
    })
  }
})
注意:这里的this.timer不会被传参到pages/index/index.js里的onload函数里,被传参到首页的定时器是计费页的定时器,后面会讲到
tips: onload函数参数说明: options的值是扫码成功后请求服务器获取的单车编号和开锁密码
// pages/index/index.js
// 点击立即用车,判断当前是否正在计费
      case 2: if(this.timer === "" || this.timer === undefined){
          // 没有在计费就扫码
          wx.scanCode({
            success: (res) => {
              // 正在获取密码通知
              wx.showLoading({
                title: '正在获取密码',
                mask: true
              })
              // 请求服务器获取密码和车号
              wx.request({
                url: 'https://www.easy-mock.com/mock/59098d007a878d73716e966f/ofodata/password',
                data: {},
                method: 'GET',
                success: function(res){
                  // 请求密码成功隐藏等待框
                  wx.hideLoading();
                  // 携带密码和车号跳转到密码页
                  wx.redirectTo({
                    url: '../scanresult/index?password=' + res.data.data.password + '&number=' + res.data.data.number,
                    success: function(res){
                      wx.showToast({
                        title: '获取密码成功',
                        duration: 1000
                      })
                    }
                  })
                }
              })
            }
          })
        // 当前已经在计费就回退到计费页
        }else{
          wx.navigateBack({
            delta: 1
          })
        }
        break;
// pages/scanresult/index.js
onload: function(options){
  console.log(options); // { password: "", number: "" }
}
6.编写计费页(billing文件夹)
上节中我们设置了计时器完成后,跳转到计费页,它是酱的:
页面分析:
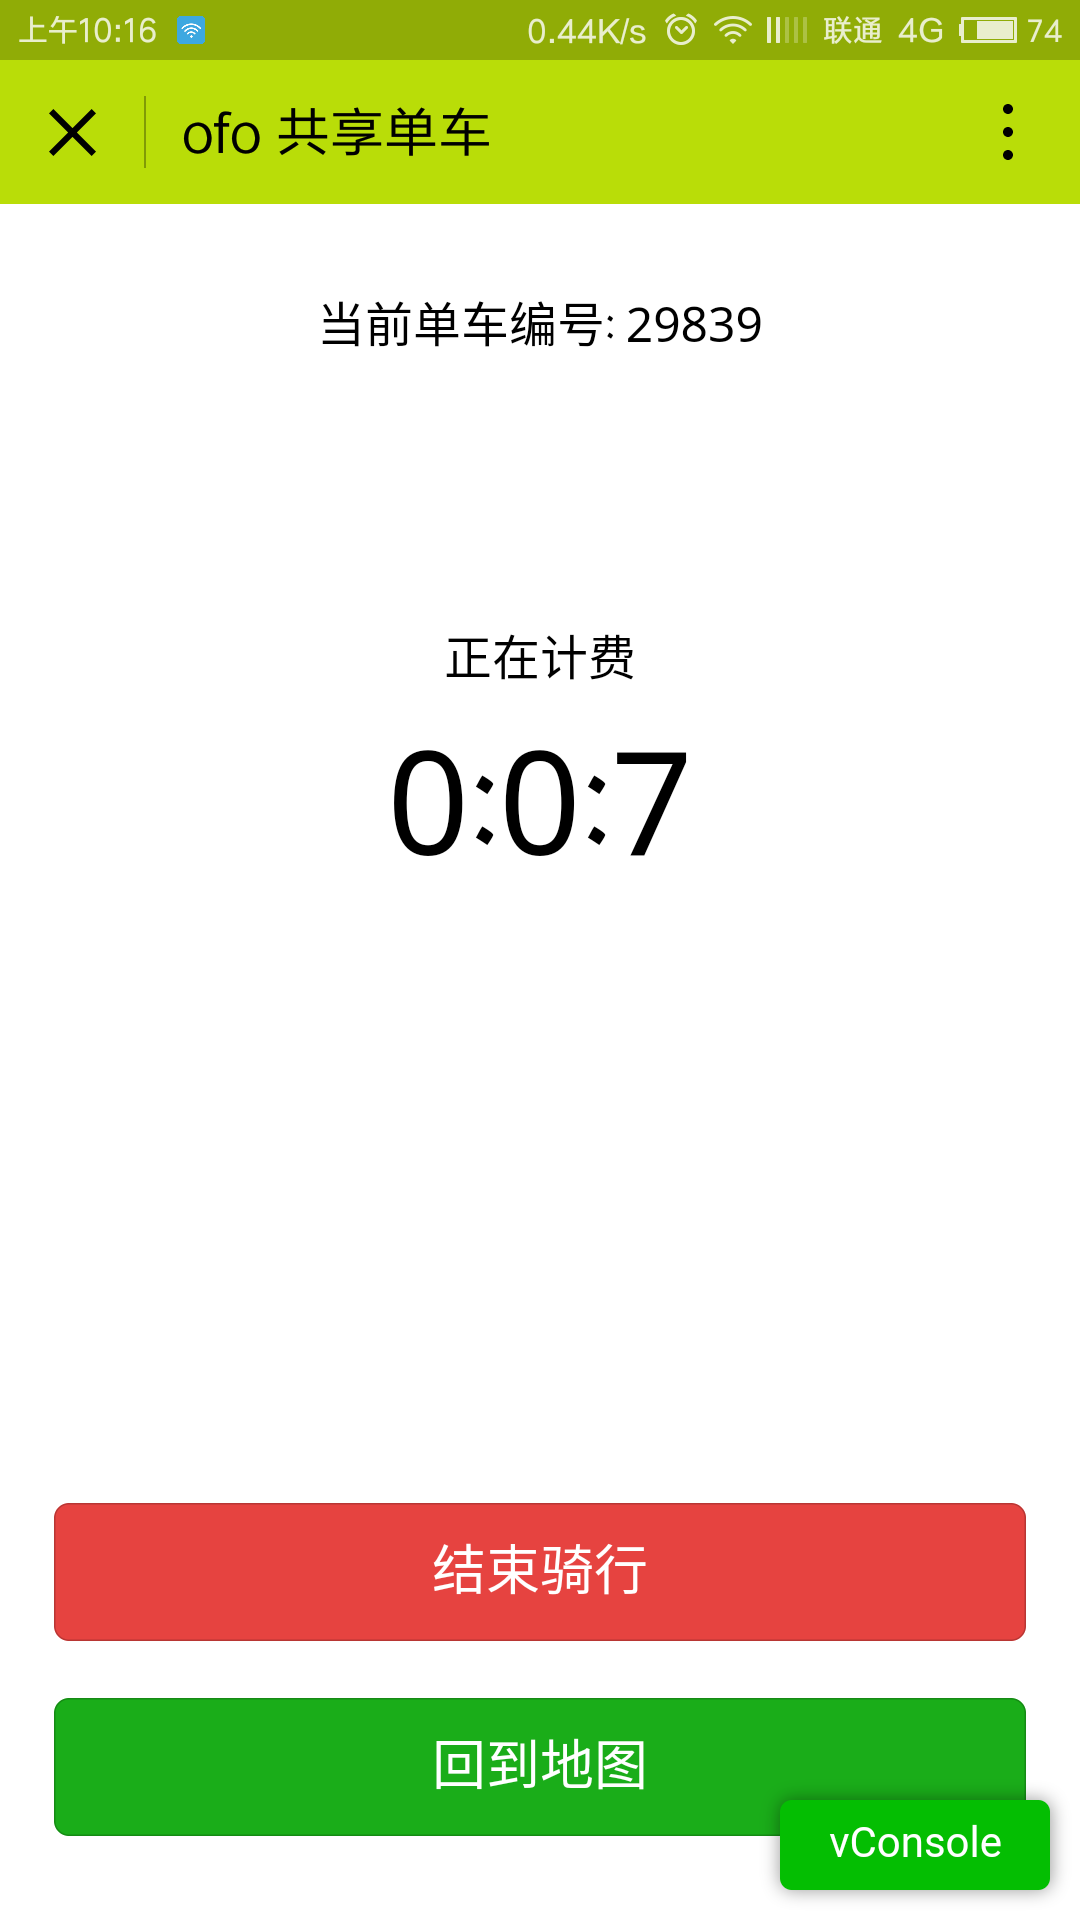
1.后台需要拿到单车编号,并显示在页面上
2.我们需要一个计时器累加骑行事件用来计费,而且可以显示最大单位是小时
3.两个按钮:结束骑行,回到地图 。其中,点击结束骑行,关闭计时器,根据累计时长计费;点击回到地图,如果计时器已经关闭了,就关闭计费页,跳转到地图。如果计时器仍然在计时,保留当前页面,跳转到地图。
4.点击回到地图会把计时器状态带给首页,首页做出判断,判定再次点击立即用车响应合理逻辑(已经在计费,不能重复扫码。已经停止计费了,需要重新扫码)
1.页面结构
<!--pages/billing/index.wxml-->
<view class="container">
    <view class="number">
        <text>当前单车编号: {{number}}</text>
    </view>
    <view class="time">
        <view class="time-title">
            <text>{{billing}}</text>
        </view>
        <view class="time-content">
            <text>{{hours}}:{{minuters}}:{{seconds}}</text>
        </view>
    </view>

    <view class="endride">
        <button type="warn" disabled="{{disabled}}" bindtap="endRide">结束骑行</button>
        <button type="primary" bindtap="moveToIndex">回到地图</button>
    </view>
</view>
2.页面样式
.container{
    width: 100%;
    display: flex;
    flex-direction: column;
    align-items: center;
    justify-content: space-between;
    background-color: #fff;
}
.number,.endride{
    padding: 60rpx 0;
    flex: 2;
    width: 100%;
    text-align: center;
}
.time{
    text-align: center;
    width: 100%;
    flex: 6;
}
.time .time-content{
    font-size: 100rpx;
}
.endride button{
    width: 90%;
    margin-top: 40rpx;
}
3.页面数据逻辑
// pages/billing/index.js
Page({
  data:{
    hours: 0,
    minuters: 0,
    seconds: 0,
    billing: "正在计费"
  },
// 页面加载
  onLoad:function(options){
    // 获取车牌号,设置定时器
    this.setData({
      number: options.number,
      timer: this.timer
    })
    // 初始化计时器
    let s = 0;
    let m = 0;
    let h = 0;
    // 计时开始
    this.timer = setInterval(() => {
      this.setData({
        seconds: s++
      })
      if(s == 60){
        s = 0;
        m++;
        setTimeout(() => {
          this.setData({
            minuters: m
          });
        },1000)
        if(m == 60){
          m = 0;
          h++
          setTimeout(() => {
            this.setData({
              hours: h
            });
          },1000)
        }
      };
    },1000)
  },
// 结束骑行,清除定时器
  endRide: function(){
    clearInterval(this.timer);
    this.timer = "";
    this.setData({
      billing: "本次骑行耗时",
      disabled: true
    })
  },
// 携带定时器状态回到地图
  moveToIndex: function(){
    // 如果定时器为空
    if(this.timer == ""){
      // 关闭计费页跳到地图
      wx.redirectTo({
        url: '../index/index'
      })
    // 保留计费页跳到地图
    }else{
      wx.navigateTo({
        url: '../index/index?timer=' + this.timer
      })
    }
  }
})
页面分析的第4步,主要实现在moveToIndex函数里。结束骑行之后,设置定时器值为空,在点击回到地图时判断计时器的状态(值是否为空)。如果为空,关闭计费页,结束本次骑行。如果不为空,携带定时器状态跳转到首页,首页立即用车点击事件就会对传过来的参数(计时器状态)响应合理逻辑。
7.编写维修报障页(warn文件夹)
点击举报控件,页面是酱的:
页面分析:
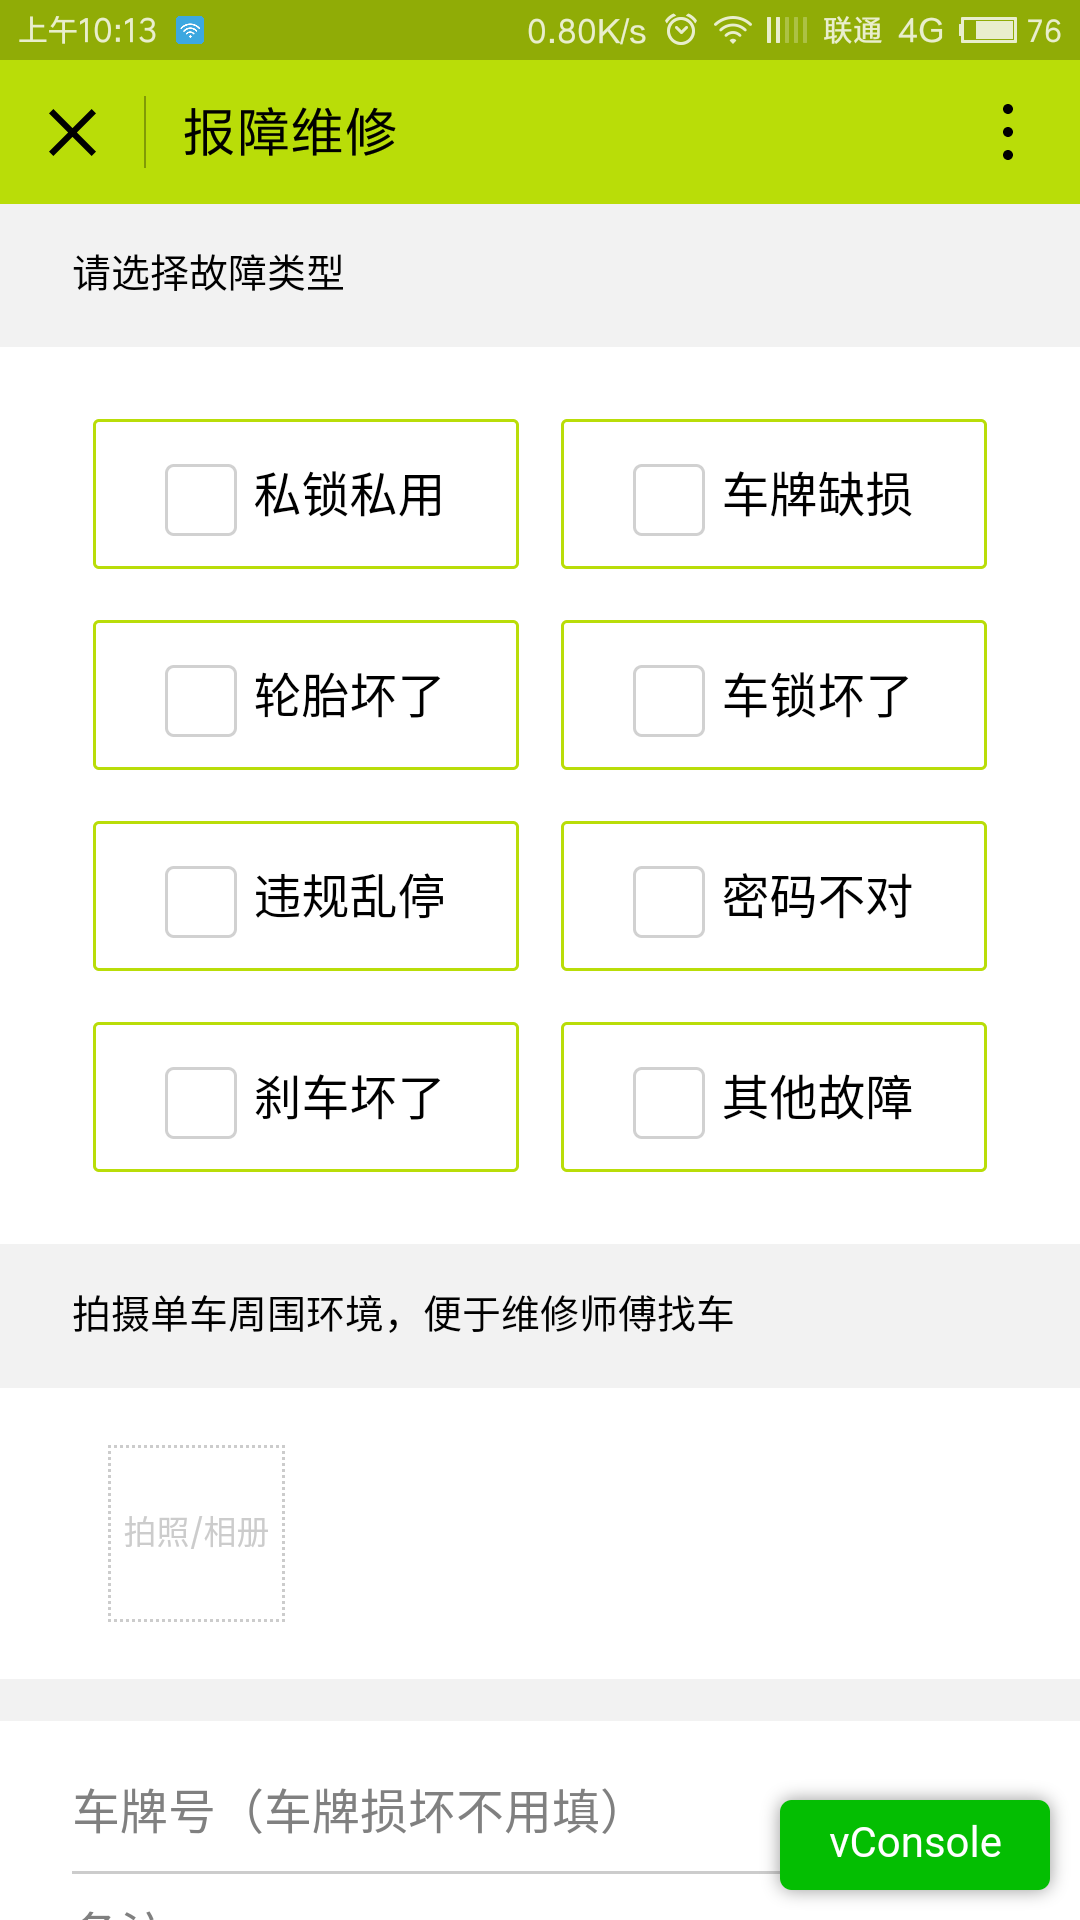
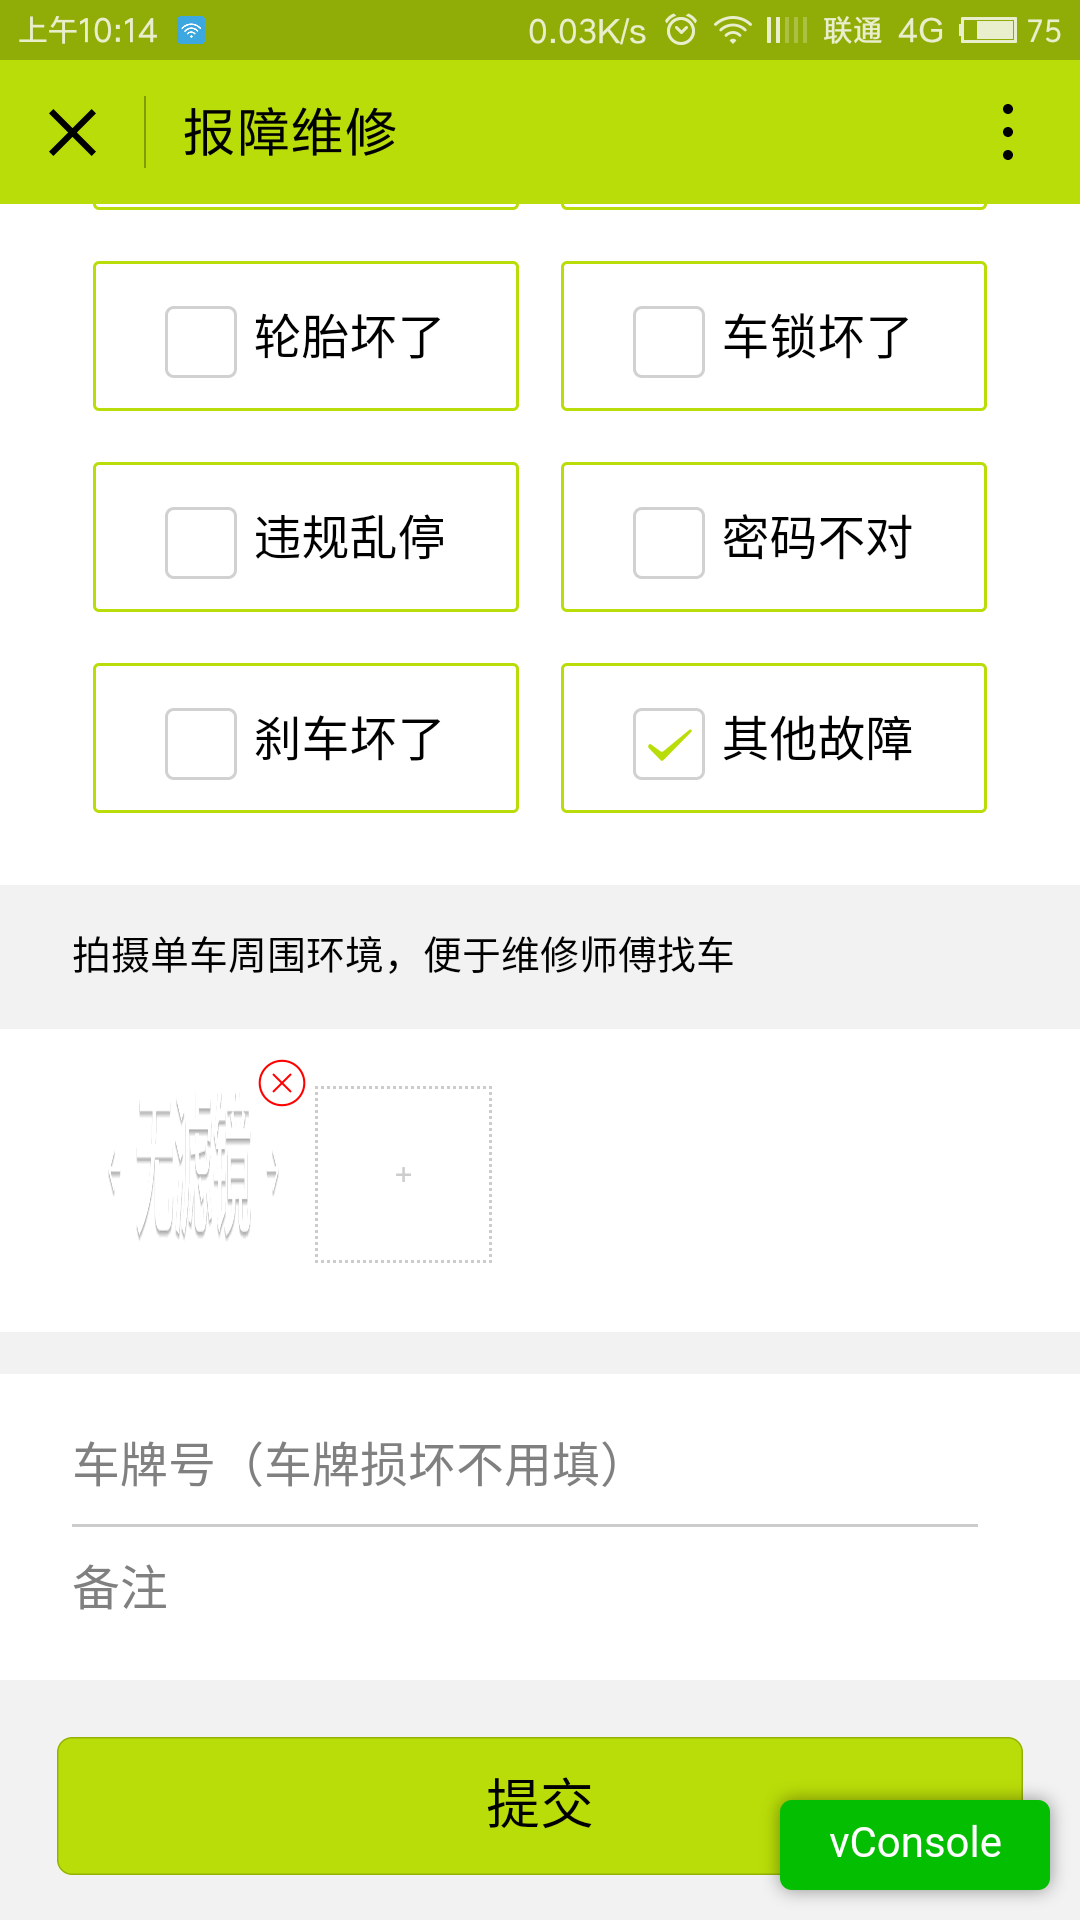
1.页面可以勾选故障类型,所以需要用到复选框组件;可以选择上传或拍摄图片,所以要使用wx.chooseImage({})选取图片API;可以输入车牌号好备注,所以需要使用input输入组件。
2.勾选类型,选择图片,输入备注信息完成后,后台需要获取这些输入的数据提交到服务器以获得反馈。
3.必须勾选类型和选择周围环境图片才能提交,否则弹窗提示。可以选择多张图片,也可以取消选择的图片。
1.页面结构
<!--pages/warn/index.wxml-->
<view class="container">
    <view class="choose">
        <view class="title">请选择故障类型</view>
        <checkbox-group bindchange="checkboxChange" class="choose-grids">
            <!-- itemsValue是data对象里定义的数组,item代表数组的每一项,此处语法为循环输出数组的每一项并渲染到每一个复选框。下面还有类似语法 -->
            <block wx:for="{{itemsValue}}" wx:key="{{item}}">
                <view class="grid">
                    <checkbox value="{{item.value}}" checked="{{item.checked}}" color="{{item.color}}" />{{item.value}}
                </view>
            </block>
        </checkbox-group>
    </view>
    <view class="action">
        <view class="title">拍摄单车周围环境,便于维修师傅找车</view>
        <view class="action-photo">
        <block wx:for="{{picUrls}}" wx:key="{{item}}" wx:index="{{index}}">
            <image src="{{item}}"><icon type="cancel" data-index="{{index}}" color="red" size="18" class ="del" bindtap="delPic" /></image>
        </block>
            <text class="add" bindtap="bindCamera">{{actionText}}</text>
        </view>
        <view class="action-input">
            <input bindinput="numberChange" name="number" placeholder="车牌号(车牌损坏不用填)" />
            <input bindinput="descChange" name="desc" placeholder="备注" />
        </view>
        <view class="action-submit">
            <button class="submit-btn" type="default" loading="{{loading}}" bindtap="formSubmit" style="background-color: {{btnBgc}}">提交</button>
        </view>
    </view>
</view>
2.页面样式
/* pages/wallet/index.wxss */
.choose{
    background-color: #fff;
}
.choose-grids{
    display: flex;
    flex-wrap: wrap;
    justify-content: space-around;
    padding: 50rpx;
}
.choose-grids .grid{
    width: 45%;
    height: 100rpx;
    margin-top: 36rpx;
    border-radius: 6rpx;
    line-height: 100rpx;
    text-align: center;
    border: 2rpx solid #b9dd08;
}
.choose-grids .grid:first-child,
.choose-grids .grid:nth-of-type(2){
    margin-top: 0;
}
.action .action-photo{
    background-color: #fff;
    padding: 40rpx 0px 40rpx 50rpx;
}
.action .action-photo image{
    position: relative;
    display: inline-block;
    width: 120rpx;
    height: 120rpx;
    overflow: visible;
    margin-left: 25rpx;
}
.action .action-photo image icon.del{
    display: block;
    position: absolute;
    top: -20rpx;
    right: -20rpx;
}
.action .action-photo text.add{
    display: inline-block;
    width: 120rpx;
    height: 120rpx;
    line-height: 120rpx;
    text-align: center;
    font-size: 24rpx;
    color: #ccc;
    border: 2rpx dotted #ccc;
    margin-left: 25rpx;
    vertical-align: top;
}
.action .action-input{
    padding-left: 50rpx;
    margin-top: 30rpx;
    background-color: #fff;
}
.action .action-input input{
    width: 90%;
    padding-top: 40rpx;
    padding-bottom: 40rpx;
}
.action .action-input input:first-child{
    border-bottom: 2rpx solid #ccc;
    padding-bottom: 20rpx;
}
.action .action-input input:last-child{
    padding-top: 20rpx;
}
.action .action-submit{
    padding: 40rpx 40rpx;
    background-color: #f2f2f2;
}
3.页面数据逻辑
// pages/wallet/index.js
Page({
  data:{
    // 故障车周围环境图路径数组
    picUrls: [],
    // 故障车编号和备注
    inputValue: {
      num: 0,
      desc: ""
    },
    // 故障类型数组
    checkboxValue: [],
    // 选取图片提示
    actionText: "拍照/相册",
    // 提交按钮的背景色,未勾选类型时无颜色
    btnBgc: "",
    // 复选框的value,此处预定义,然后循环渲染到页面
    itemsValue: [
      {
        checked: false,
        value: "私锁私用",
        color: "#b9dd08"
      },
      {
        checked: false,
        value: "车牌缺损",
        color: "#b9dd08"
      },
      {
        checked: false,
        value: "轮胎坏了",
        color: "#b9dd08"
      },
      {
        checked: false,
        value: "车锁坏了",
        color: "#b9dd08"
      },
      {
        checked: false,
        value: "违规乱停",
        color: "#b9dd08"
      },
      {
        checked: false,
        value: "密码不对",
        color: "#b9dd08"
      },
      {
        checked: false,
        value: "刹车坏了",
        color: "#b9dd08"
      },
      {
        checked: false,
        value: "其他故障",
        color: "#b9dd08"
      }
    ]
  },
// 页面加载
  onLoad:function(options){
    wx.setNavigationBarTitle({
      title: '报障维修'
    })
  },
// 勾选故障类型,获取类型值存入checkboxValue
  checkboxChange: function(e){
    let _values = e.detail.value;
    if(_values.length == 0){
      this.setData({
        btnBgc: ""
      })
    }else{
      this.setData({
        checkboxValue: _values,
        btnBgc: "#b9dd08"
      })
    }
  },
// 输入单车编号,存入inputValue
  numberChange: function(e){
    this.setData({
      inputValue: {
        num: e.detail.value,
        desc: this.data.inputValue.desc
      }
    })
  },
// 输入备注,存入inputValue
  descChange: function(e){
    this.setData({
      inputValue: {
        num: this.data.inputValue.num,
        desc: e.detail.value
      }
    })
  },
// 提交到服务器
  formSubmit: function(e){
    if(this.data.picUrls.length > 0 && this.data.checkboxValue.length> 0){
      wx.request({
        url: 'https://www.easy-mock.com/mock/59098d007a878d73716e966f/ofodata/msg',
        data: {
          // picUrls: this.data.picUrls,
          // inputValue: this.data.inputValue,
          // checkboxValue: this.data.checkboxValue
        },
        method: 'get', // POST
        // header: {}, // 设置请求的 header
        success: function(res){
          wx.showToast({
            title: res.data.data.msg,
            icon: 'success',
            duration: 2000
          })
        }
      })
    }else{
      wx.showModal({
        title: "请填写反馈信息",
        content: '看什么看,赶快填反馈信息,削你啊',
        confirmText: "我我我填",
        cancelText: "劳资不填",
        success: (res) => {
          if(res.confirm){
            // 继续填
          }else{
            console.log("back")
            wx.navigateBack({
              delta: 1 // 回退前 delta(默认为1) 页面
            })
          }
        }
      })
    }

  },
// 选择故障车周围环境图 拍照或选择相册
  bindCamera: function(){
    wx.chooseImage({
      count: 4,
      sizeType: ['original', 'compressed'],
      sourceType: ['album', 'camera'],
      success: (res) => {
        let tfps = res.tempFilePaths;
        let _picUrls = this.data.picUrls;
        for(let item of tfps){
          _picUrls.push(item);
          this.setData({
            picUrls: _picUrls,
            actionText: "+"
          });
        }
      }
    })
  },
// 删除选择的故障车周围环境图
  delPic: function(e){
    let index = e.target.dataset.index;
    let _picUrls = this.data.picUrls;
    _picUrls.splice(index,1);
    this.setData({
      picUrls: _picUrls
    })
  }
})
注意: 这里选择的图片,路径为本地路径,如果要上传到服务器,需要调用API上传图片而不是上传本地路径。即不能把picUrls数组上传到服务器。
8.编写登录/未登录页(my文件夹)
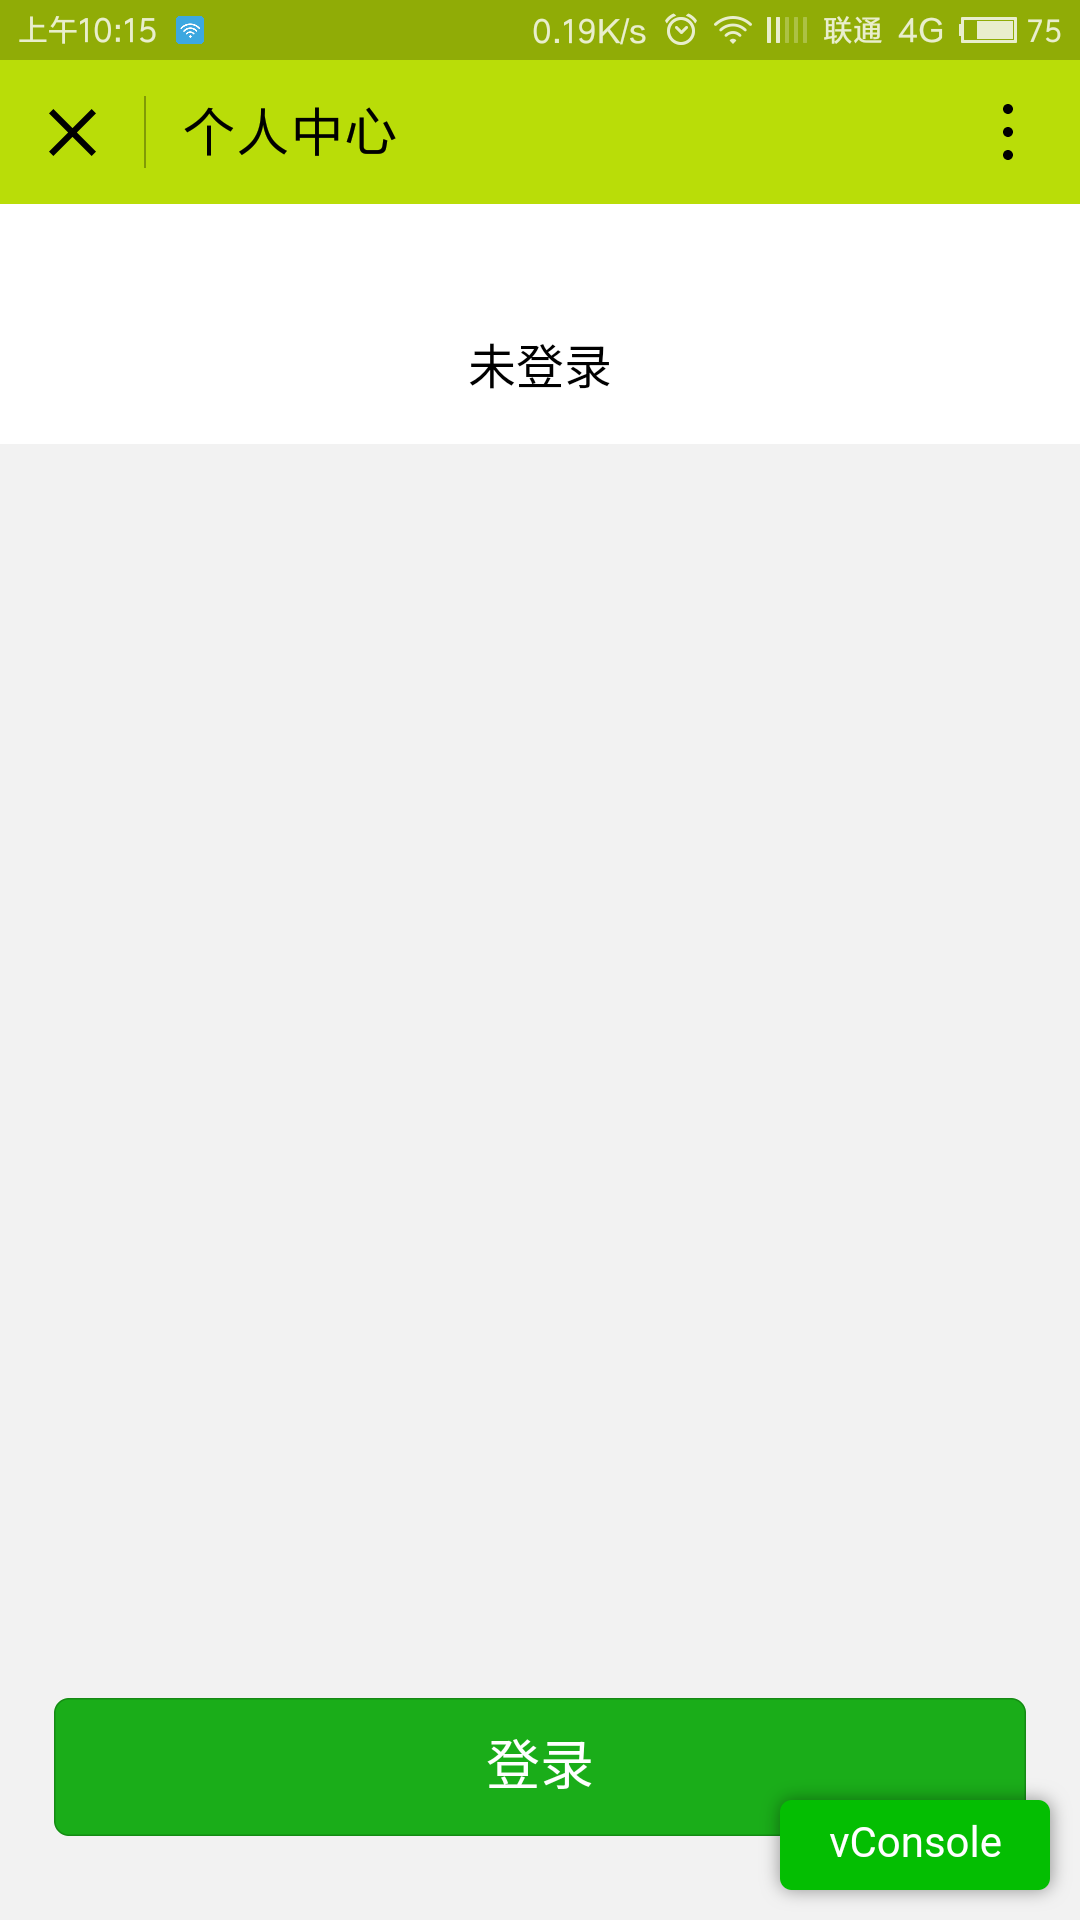
点击头像控件,未登录,页面是酱的
点击头像控件,已登录,页面是酱的

页面分析
1.个人中心页有两种状态,即未登录和已登录,所以要求数据驱动页面表现形式
2.点击登录/退出登录按钮需要响应合理逻辑,并改变按钮样式
3.只有登录状态下才会显示我的钱包按钮
1.页面结构(wx:if 是条件语句)
<!--pages/my/index.wxml-->
<view class="container">
    <view class="user-info">
    <!-- 用户未登录就没有头像-->
    <block wx:if="{{userInfo.avatarUrl != ''}}">
        <image src="{{userInfo.avatarUrl}}"></image>
    </block>
        <text>{{userInfo.nickName}}</text>
    </view>
    <!-- 用户未登录就没有钱包按钮-->
    <block wx:if="{{userInfo.avatarUrl != ''}}">
    <view class="my-wallet tapbar" bindtap="movetoWallet">
        <text>我的钱包</text>
        <text>></text>
    </view>
    </block>
    <button bindtap="bindAction" class="btn-login" hover-class="gray" type="{{bType}}" >{{actionText}}</button>
</view>
2.页面样式
/* pages/my/index.wxss */
.user-info{
    background-color: #fff;
    padding-top: 60rpx;
}
.user-info image{
    display: block;
    width: 180rpx;
    height: 180rpx;
    border-radius: 50%;
    margin: 0 auto 40rpx;
    box-shadow: 0 0 20rpx rgba(0,0,0,.2)
}
.user-info text{
    display: block;
    text-align: center;
    padding: 30rpx 0;
    margin-bottom: 30rpx;
}
.btn-login{
    position: absolute;
    bottom: 60rpx;
    width: 90%;
    left: 50%;
    margin-left: -45%;
}
.gray{
    background-color: #ccc;
}
3.页面数据逻辑
// pages/my/index.js
Page({
  data:{
    // 用户信息
    userInfo: {
      avatarUrl: "",
      nickName: "未登录"
    },
    bType: "primary", // 按钮类型
    actionText: "登录", // 按钮文字提示
    lock: false //登录按钮状态,false表示未登录
  },
// 页面加载
  onLoad:function(){
    // 设置本页导航标题
    wx.setNavigationBarTitle({
      title: '个人中心'
    })
    // 获取本地数据-用户信息
    wx.getStorage({
      key: 'userInfo',
      // 能获取到则显示用户信息,并保持登录状态,不能就什么也不做
      success: (res) => {
        wx.hideLoading();
        this.setData({
          userInfo: {
            avatarUrl: res.data.userInfo.avatarUrl,
            nickName: res.data.userInfo.nickName
          },
          bType: res.data.bType,
          actionText: res.data.actionText,
          lock: true
        })
      }
    });
  },
// 登录或退出登录按钮点击事件
  bindAction: function(){
    this.data.lock = !this.data.lock
    // 如果没有登录,登录按钮操作
    if(this.data.lock){
      wx.showLoading({
        title: "正在登录"
      });
      wx.login({
        success: (res) => {
          wx.hideLoading();
          wx.getUserInfo({
            withCredentials: false,
            success: (res) => {
              this.setData({
                userInfo: {
                  avatarUrl: res.userInfo.avatarUrl,
                  nickName: res.userInfo.nickName
                },
                bType: "warn",
                actionText: "退出登录"
              });
              // 存储用户信息到本地
              wx.setStorage({
                key: 'userInfo',
                data: {
                  userInfo: {
                    avatarUrl: res.userInfo.avatarUrl,
                    nickName: res.userInfo.nickName
                  },
                  bType: "warn",
                  actionText: "退出登录"
                },
                success: function(res){
                  console.log("存储成功")
                }
              })
            }
          })
        }
      })
    // 如果已经登录,退出登录按钮操作
    }else{
      wx.showModal({
        title: "确认退出?",
        content: "退出后将不能使用ofo",
        success: (res) => {
          if(res.confirm){
            console.log("确定")
            // 退出登录则移除本地用户信息
            wx.removeStorageSync('userInfo')
            this.setData({
              userInfo: {
                avatarUrl: "",
                nickName: "未登录"
              },
              bType: "primary",
              actionText: "登录"
            })
          }else {
            console.log("cancel")
            this.setData({
              lock: true
            })
          }
        }
      })
    }
  },
// 跳转至钱包
  movetoWallet: function(){
    wx.navigateTo({
      url: '../wallet/index'
    })
  }
})
我们将用户信息使用wx.setStorage({})和wx.getStorage({})这两个API来设置和获取本地存储,用于模拟维护用户登录状态。真实情况下需要使用session
9.编写我的钱包页
假设用户已登录,点击钱包,页面是酱的:
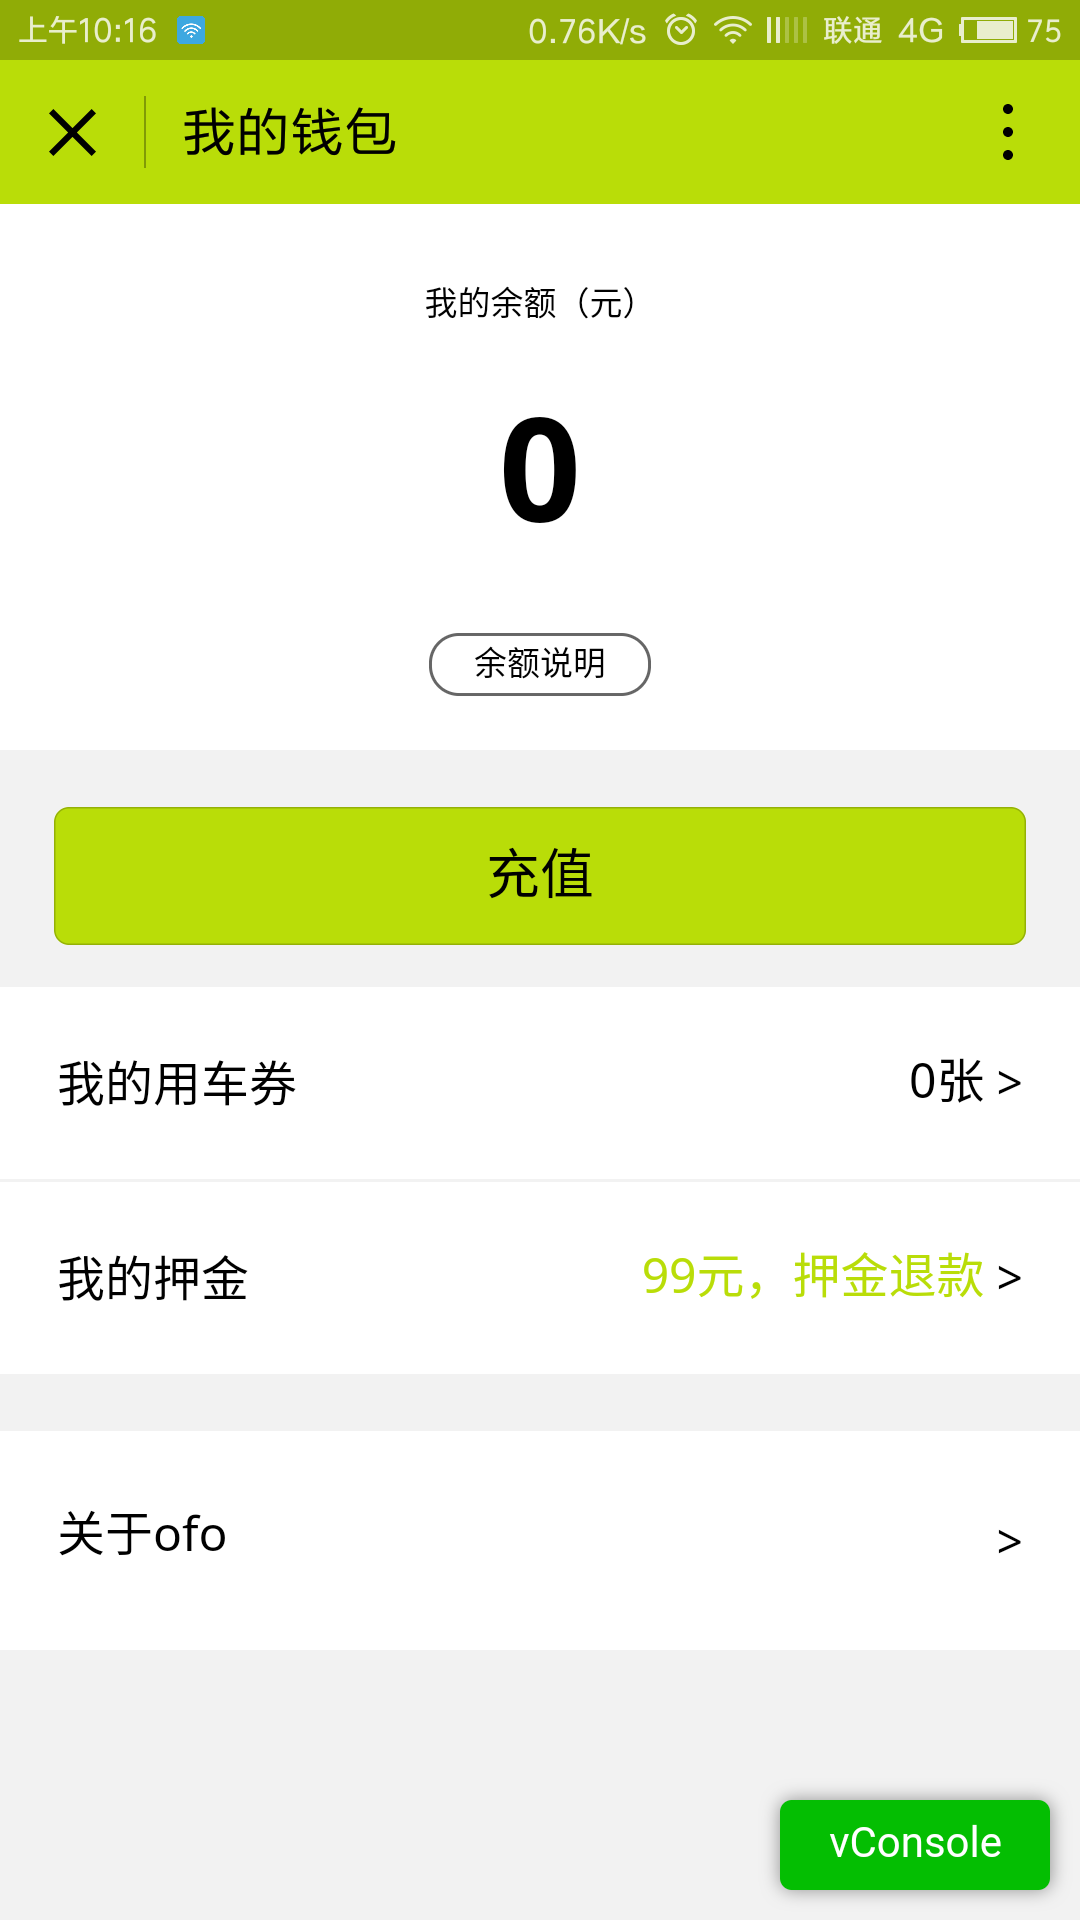
页面分析
1.需要获取钱包余额数据并显示在页面上,充值后数据会自动更新
2.其他可点击按钮分别显示对应的模态框,因为微信只允许五个页面层级,避免过多页面层级造成用户迷失。
1.页面结构
<!--pages/wallet/index.wxml-->
<view class="container">
    <view class="overage">
        <view>
            <text class="overage-header">我的余额(元)</text>
        </view>
        <view>
            <text class="overage-amount">{{overage}}</text>
        </view>
        <view>
            <text bindtap="overageDesc" class="overage-desc">余额说明</text>
        </view>
    </view>
    <button bindtap="movetoCharge" class="btn-charge">充值</button>
    <view bindtap="showTicket" class="my-ticket tapbar">
        <text>我的用车券</text>
        <text><text class="c-g">{{ticket}}张</text>></text>
    </view>
    <view bindtap="showDeposit" class="my-deposit tapbar">
        <text>我的押金</text>
        <text><text class="c-y">99元,押金退款</text>></text>
    </view>
    <view bindtap="showInvcode" class="my-invcode tapbar">
        <text>关于ofo</text>
        <text>></text>
    </view>
</view>
2.页面样式
/* pages/wallet/index.wxss */
.overage{
    background-color: #fff;
    padding: 40rpx 0;
    text-align: center;
}
.overage-header{
    font-size: 24rpx;
}
.overage-amount{
    display: inline-block;
    padding: 20rpx 0;
    font-size: 100rpx;
    font-weight: 700;
}
.overage-desc{
    padding: 10rpx 30rpx;
    font-size: 24rpx;
    border-radius: 40rpx;
    border: 1px solid #666;
}
.my-deposit{
    margin-top: 2rpx;
}
.my-invcode{
    margin-top: 40rpx;
}
.c-y{
    color: #b9dd08;
    padding-top: -5rpx;
    padding-right: 10rpx;
}
.c-g{
    padding-top: -5rpx;
    padding-right: 10rpx;
}
3.页面数据逻辑
// pages/wallet/index.js
Page({
  data:{
    overage: 0,
    ticket: 0
  },
// 页面加载
  onLoad:function(options){
     wx.setNavigationBarTitle({
       title: '我的钱包'
     })
  },
// 页面加载完成,更新本地存储的overage
  onReady:function(){
     wx.getStorage({
      key: 'overage',
      success: (res) => {
        this.setData({
          overage: res.data.overage
        })
      }
    })
  },
// 页面显示完成,获取本地存储的overage
  onShow:function(){
    wx.getStorage({
      key: 'overage',
      success: (res) => {
        this.setData({
          overage: res.data.overage
        })
      }
    })
  },
// 余额说明
  overageDesc: function(){
    wx.showModal({
      title: "",
      content: "充值余额0.00元+活动赠送余额0.00元",
      showCancel: false,
      confirmText: "我知道了",
    })
  },
// 跳转到充值页面
  movetoCharge: function(){
    // 关闭当前页面,跳转到指定页面,返回时将不会回到当前页面
    wx.redirectTo({
      url: '../charge/index'
    })
  },
// 用车券
  showTicket: function(){
    wx.showModal({
      title: "",
      content: "你没有用车券了",
      showCancel: false,
      confirmText: "好吧",
    })
  },
// 押金退还
  showDeposit: function(){
    wx.showModal({
      title: "",
      content: "押金会立即退回,退款后,您将不能使用ofo共享单车确认要进行此退款吗?",
      cancelText: "继续使用",
      cancelColor: "#b9dd08",
      confirmText: "押金退款",
      confirmColor: "#ccc",
      success: (res) => {
        if(res.confirm){
          wx.showToast({
            title: "退款成功",
            icon: "success",
            duration: 2000
          })
        }
      }
    })
  },
// 关于ofo
  showInvcode: function(){
    wx.showModal({
      title: "ofo共享单车",
      content: "微信服务号:ofobike,网址:m.ofo.so",
      showCancel: false,
      confirmText: "玩的6"
    })
  }
})
我们将金额信息使用wx.setStorage({})和wx.getStorage({})这两个API来设置和获取本地存储,用于模拟充值逻辑。
设置本地存储API官方文档
10.编写充值页面(charge文件夹)
点击充值按钮,页面是酱的
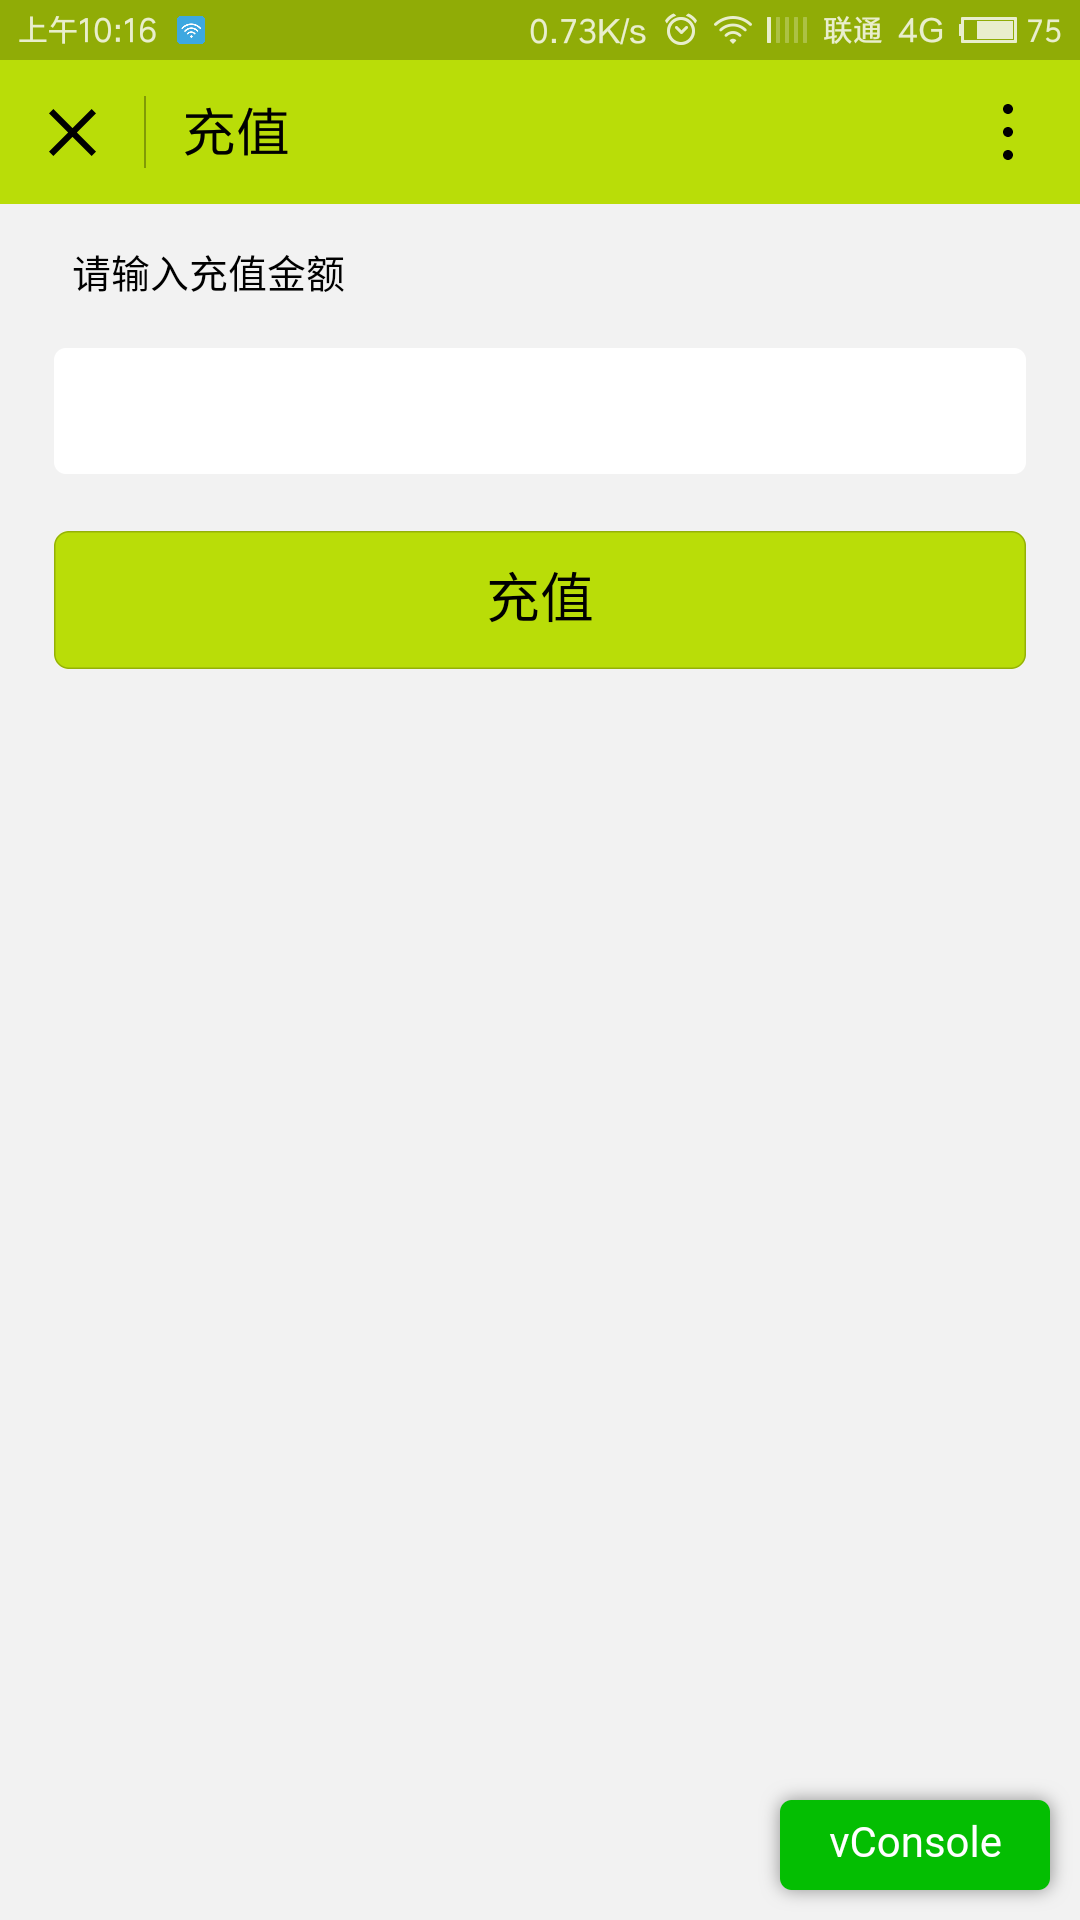
页面分析
1.输入金额,存储在data对象里,点击充值后,设置本地金额数据
2.点击充值按钮后自动跳转到钱包页。
1.页面结构
<!--pages/charge/index.wxml-->
<view class="container">
    <view class="title">请输入充值金额</view>
    <view class="input-box">
        <input bindinput="bindInput" />
    </view>
    <button bindtap="charge" class="btn-charge">充值</button>
</view>
2.页面样式
/* pages/charge/index.wxss */
.input-box{
    background-color: #fff;
    margin: 0 auto;
    padding: 20rpx 0;
    border-radius: 10rpx;
    width: 90%;

}
.input-box input{
    width: 100%;
    height: 100%;
    text-align: center;
}
3.页面数据逻辑
// pages/charge/index.js
Page({
  data:{
    inputValue: 0
  },
// 页面加载
  onLoad:function(options){
    wx.setNavigationBarTitle({
      title: '充值'
    })
  },
// 存储输入的充值金额
  bindInput: function(res){
    this.setData({
      inputValue: res.detail.value
    })
  },
// 充值
  charge: function(){
    // 必须输入大于0的数字
    if(parseInt(this.data.inputValue) <= 0 || isNaN(this.data.inputValue)){
      wx.showModal({
        title: "警告",
        content: "咱是不是还得给你钱?!!",
        showCancel: false,
        confirmText: "不不不不"
      })
    }else{
      wx.redirectTo({
        url: '../wallet/index',
        success: function(res){
          wx.showToast({
            title: "充值成功",
            icon: "success",
            duration: 2000
          })
        }
      })
    }
  },
// 页面销毁,更新本地金额,(累加)
  onUnload:function(){
    wx.getStorage({
      key: 'overage',
      success: (res) => {
        wx.setStorage({
          key: 'overage',
          data: {
            overage: parseInt(this.data.inputValue) + parseInt(res.data.overage)
          }
        })
      },
      // 如果没有本地金额,则设置本地金额
      fail: (res) => {
        wx.setStorage({
          key: 'overage',
          data: {
            overage: parseInt(this.data.inputValue)
          },
        })
      }
    })
  }
})
充值页面关闭时更新本地金额数据,所以需要在unLoad事件里执行
扩展:使用easy-mock伪造数据
小程序多次请求了服务器“发送/接受”数据,其实这里使用了easy-mock这个网站伪造的数据。
easy-mock可以作为前端开发的伪后端,自己构造数据来测试前端代码。方便又快捷。官网戳这里。
比如我们这个小程序用到了后端api接口
1.提交报障信息的反馈
2.单车编号和解锁密码
3.单车经纬度
结语
到这里,ofo小程序的制作就到了尾声了。开篇我们创建了多个页面,然后一个一个页面从页面分析,到完成数据逻辑,分别响应着不同的业务逻辑,有的页面与页面之间有数据往来,我们就通过跳转页面传参或设置本地存储来将它们建立起联系,环环相扣,构建起了整个小程序的基本功能。
通过这个小程序,我们发现文档提供的API在不知不觉中已经失去了它的神秘感,它们就是不同的工具,为小程序实现业务请求搭建肢体骨架。
源码在我的github主页上,有需要的欢迎fork


